# Qwen-VL-Chat Tutorial
Qwen-VL-Chat은 범용 멀티모달 대규모 언어 모델이며 광범위한 시각 언어 작업을 수행할 수 있습니다. 이 튜토리얼에서는 **시각적 질문 답변, 텍스트 이해, 다이어그램을 사용한 수학적 추론, 다중 그림 추론 및 그라운딩(Grounding) 작업**에서 Qwen-VL-Chat의 기능을 보여주는 몇 가지 간결한 예제를 제시합니다. Qwen-VL-Chat의 기능의 한계가 아니며, **입력 이미지와 프롬프트를 변경하여 Qwen-VL-Chat의 기능**을 더 자세히 살펴보실 수도 있습니다.
## Initializing the Qwen-VL-Chat model
Qwen-VL-Chat을 사용하기 전에 먼저 Qwen-VL-Chat의 Tokenizer와 Qwen-VL-Chat의 모델을 초기화해야 합니다.
```python
import torch
from transformers import AutoModelForCausalLM, AutoTokenizer
from transformers.generation import GenerationConfig
# If you expect the results to be reproducible, set a random seed.
# torch.manual_seed(1234)
tokenizer = AutoTokenizer.from_pretrained("Qwen/Qwen-VL-Chat", trust_remote_code=True)
model = AutoModelForCausalLM.from_pretrained("Qwen/Qwen-VL-Chat", device_map="cuda", trust_remote_code=True).eval()
model.generation_config = GenerationConfig.from_pretrained("Qwen/Qwen-VL-Chat", trust_remote_code=True)
```
위 코드를 실행하시면 ```tokenizer```변수에 Qwen-VL-Chat에서 사용하는 분류기(classifier)가 할당되고, ```model```변수에는 Qwen-VL-Chat의 모델을 할당하게 됩니다. ```tokenizer```는 인터리브된 멀티모달 입력(interleaved multimodal inputs)을 전처리하는 데 사용되며, ``model``은 Qwen-VL-Chat 모델입니다.
## Using Qwen-VL-Chat
### **Multi-round visual question answering**
#### **첫 질문하기**
간단한 예제를 확인해보겠습니다. 아래에서 볼 수 있듯이, ```assets/mm_tutorial/Rebecca_(1939_poster).jpeg``` 파일은 1940년 영화 <레베카>의 포스터입니다.
_Small.jpeg)
Qwen-VL-Chat 포스터에 있는 영화 제목이 무엇인지 물어봅시다. 우선, 입력을 전처리하고 토큰화할 수 있는 ```tokenizer.from_list_format```을 사용합니다.
```python
query = tokenizer.from_list_format([
{'image': 'assets/mm_tutorial/Rebecca_(1939_poster).jpeg'},
{'text': 'What is the name of the movie in the poster?'},
])
```
다음으로, ```model.chat```을 사용하여 Qwen-VL-Chat 모델에 질문하고 응답을 얻을 수 있습니다. 첫 번째 질문의 경우 대화 기록이 비어 있으므로 ``history=None``을 사용합니다.
```python
response, history = model.chat(tokenizer, query=query, history=None)
print(response)
```
다음과 비슷한 출력이 나올 것입니다.
> The name of the movie in the poster is "Rebecca."
모델이 주어진 질문에 정답을 맞혔습니다. 포스터에 따르면, 영화의 제목은 실제로 **레베카**입니다.
#### **Multi-round question answering**
또한 모델에게 영화 감독이 누구인지와 같은 다른 질문을 계속할 수도 있습니다. 대화 기록은 후속 질문을 위해 비어 있지 않으므로 ``history=history``를 사용하여 이전 대화의 기록을 ``model.chat``에 전달합니다:
```python
query = tokenizer.from_list_format([
{'text': 'Who directed this movie?'},
])
response, history = model.chat(tokenizer, query=query, history=history)
print(response)
```
다음과 비슷한 출력이 나올 것입니다.
> The movie "Rebecca" was directed by Alfred Hitchcock.
다시 한 번, 모델이 주어진 질문에 대한 정답을 맞혔습니다. 포스터에 따르면 이 영화의 감독은 <알프레드 히치콕>입니다.
### **Text Understanding**
Qwen-VL-Chat은 촘촘한 텍스트가 포함된 이미지도 이해할 수 있습니다. 아래 그림과 같이 ``assets/mm_tutorial/Hospital.jpeg`` 파일은 촘촘한 텍스트가 포함된 병원 간판입니다.
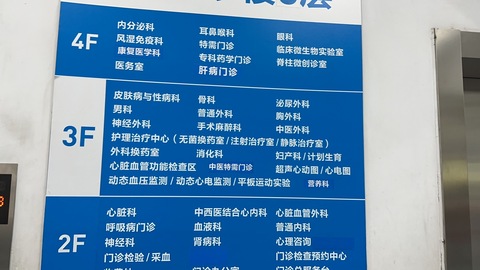
병원 내 여러 부서의 위치에 대해 질문할 수 있습니다. 첫 질문으로 대화에 대한 이전 기록이 없으므로 ```history=None```을 사용합니다.
```python
query = tokenizer.from_list_format([
{'image': 'assets/mm_tutorial/Hospital.jpg'},
{'text': 'Based on the photo, which floor is the Department of Otorhinolaryngology on?'},
])
response, history = model.chat(tokenizer, query=query, history=None)
print(response)
```
다음과 비슷한 출력이 나올 것입니다.
> The Department of Otorhinolaryngology is located on the 4th floor.
추가 질문을 하실 수도 있습니다. 이 경우 ```history=history```를 사용하여 이전 대화의 기록을 ```model.chat```에 전달해야 합니다.
```python
query = tokenizer.from_list_format([
{'text': 'Based on the photo, which floor is the Department of Surgery on?'},
])
response, history = model.chat(tokenizer, query=query, history=history)
print(response)
```
다음과 비슷한 출력이 나올 것입니다.
> The Department of Surgery is located on the 3rd floor.
### **Mathematical Reasoning with Diagram**
모델의 다이어그램 이해와 수학적 추론 기능을 사용하여 Qwen-VL-Chat은 좀 더 복잡한 작업도 수행할 수 있습니다. 아래에서 볼 수 있듯이 ``assets/mm_tutorial/Menu.jpeg`` 파일은 레스토랑의 메뉴 이미지 입니다. 이제 연어 버거 두 개와 미트 러버스 피자 세 개를 구매하는 데 드는 비용을 알아봅시다.
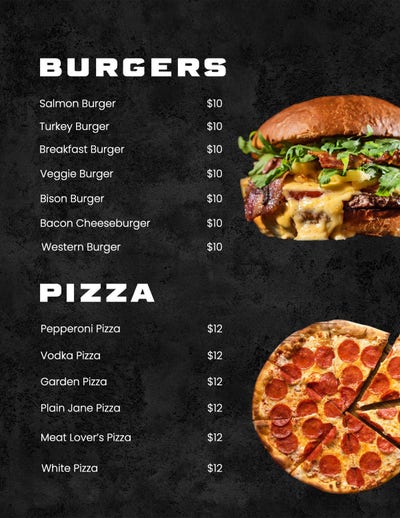
```python
query = tokenizer.from_list_format([
{'image': 'assets/mm_tutorial/Menu.jpeg'},
{'text': 'How much would I pay if I want to order two Salmon Burger and three Meat Lover\'s Pizza? Think carefully step by step.'},
])
response, history = model.chat(tokenizer, query=query, history=None)
print(response)
```
``단계별로 신중하게 생각하세요``는 복잡한 작업을 단계별로 모델에 안내하는 일반적인 프롬프트입니다. 따라서 완료해야 할 복잡한 작업이 있는 경우에는 이 프롬프트를 사용하여 모델의 정확도를 향상시켜 보세요. 다음과 유사한 출력이 나올 것입니다.
> To order two Salmon Burgers and three Meat Lover's Pizzas, you would need to pay the following:
>
> 1. For two Salmon Burgers: x2 Salmon Burgers at $10 each = $20
> 2. For three Meat Lover's Pizzas: x3 Meat Lover's Pizzas at $12 each = $36
>
> Therefore, the total cost would be $56.
### **Multi-Figure Reasoning and Chinese Input**
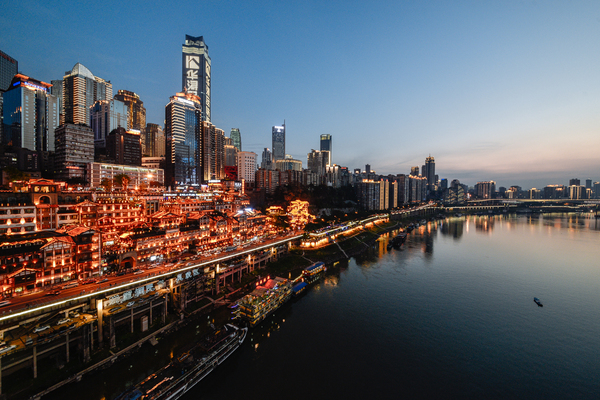
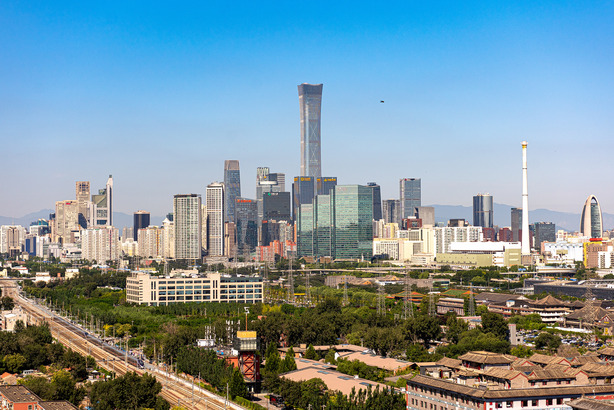
이전 예제에서는 단일 이미지와 영어 질문에 대한 Qwen-VL-Chat의 질문 답변 기능을 시연했습니다. 하지만 실제로는 중국어 입력과 여러 이미지를 지원하는 다국어 모델입니다. 다음 예제에서는 두 도시(충칭과 베이징)의 사진(`assets/mm_tutorial/Chongqing.jpeg` 및 `assets/mm_tutorial/Beijing.jpeg`)을 중국어로 비교하도록 Qwen-VL-Chat을 설정했습니다.
```python
query = tokenizer.from_list_format([
{'image': 'assets/mm_tutorial/Chongqing.jpeg'},
{'image': 'assets/mm_tutorial/Beijing.jpeg'},
{'text': '上面两张图片分别是哪两个城市?请对它们进行对比。'},
])
torch.manual_seed(5678)
response, history = model.chat(tokenizer, query=query, history=None)
print(response)
```
다음과 유사한 출력이 나올 것입니다.
> 第一张图片是重庆的城市天际线,它反映了现代都市的繁华与喧嚣。第二张图片是北京的天际线,它象征着中国首都的现代化和国际化。两座城市都是中国的重要城市,拥有独特的文化和发展历史。
**도시 비교는 상당히 주관적인 질문이므로 모델에 의해 생성된 응답에는 매우 다양하게 무작위의 시드가 적용될 수 있다는 점을 유의하세요. ``torch.manual_seed(5678)```를 사용하여 무작위 시드를 설정하지 않으면 매번 출력이 달라집니다. 랜덤 시드를 설정하더라도 하드웨어 및 소프트웨어 환경의 차이로 인해 얻은 결과가 이 튜토리얼과 다를 수 있습니다**.
### **Grounding Capability**
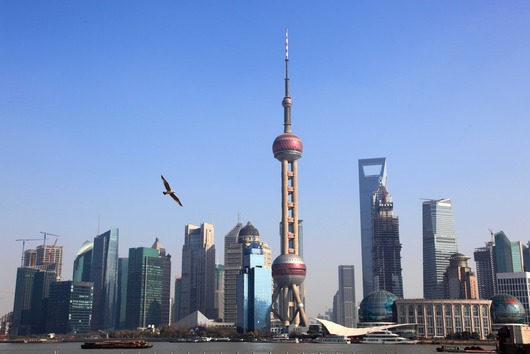
튜토리얼의 마지막 섹션에서는 Qwen-VL-Chat 모델이 바운딩 박스를 생성하는 기능을 보여드립니다. Qwen-VL-Chat은 언어 설명에 따라 직사각형 상자로 이미지의 지정된 영역에 프레임을 지정할 수 있습니다. 다소 추상적일 수 있으므로 다음 예제를 살펴보겠습니다. 아래 그림과 같이 ```assets/mm_tutorial/Shanghai.jpg`` 파일은 상하이의 사진이며, 모델에게 일반 프롬프트로 이미지를 설명하도록 요청하는 것으로 시작하겠습니다.
```python
torch.manual_seed(1234)
query = tokenizer.from_list_format([
{'image': 'assets/mm_tutorial/Shanghai.jpg'},
{'text': '图里有啥'},
])
response, history = model.chat(tokenizer, query=query, history=None)
print(response)
```
다음과 유사한 출력을 보실 수 있습니다.
> 图中是中国上海的天际线,包括了上海塔、金茂大厦、上海环球金融中心、海洋大厦等著名建筑。
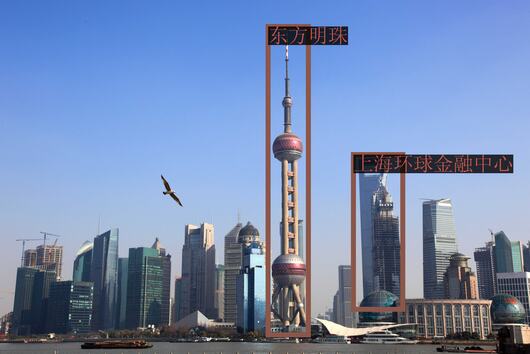
다음으로 '``请给我框出图中上海环球金融中心和东方明珠``라는 프롬프트를 사용하여 모델과 대화하고 어떤 일이 발생하는지 살펴봅시다. 이 시점에서 ``history=history``를 사용하여 이전 대화의 기록을 ``model.chat``에 전달해야 합니다.
```python
query = tokenizer.from_list_format([
{'text': '请给我框出图中上海环球金融中心和东方明珠'},
])
response, history = model.chat(tokenizer, query=query, history=history)
print(response)
```
다음과 유사한 출력을 보실 수 있습니다.
```xml
[上海环球金融中心](667,437),(760,874)和[东方明珠](506,75),(582,946)
```
Qwen-VL-Chat 모델에는 손이 없지만 사용자의 요청을 거부하지도 않습니다. 대신 "이상한" 결과를 출력하는데, 실제로 이 모델의 출력은 上海环球金融中心(상하이 월드 파이낸셜 센터) 와 东方明珠(동방명주) 의 위치를 마크업 언어로 제공합니다. 다음 코드를 사용하여 시각화할 수 있습니다.
```python
image = tokenizer.draw_bbox_on_latest_picture(response, history)
image.save('Shanghai_Output.jpg')
```
The saved ```Shanghai_Output.jpg``` will look similar to the screenshot below:
그 후에도 이전처럼 Qwen-VL-Chat으로 계속 채팅할 수 있습니다.
```python
query = tokenizer.from_list_format([
{'text': '帮我写个这座城市的旅游计划'},
])
response, history = model.chat(tokenizer, query=query, history=history)
print(response)
```
다음과 유사한 출력을 보실 수 있습니다.
> 好的,以下是一个简单的上海旅游计划:
>
> 第一天:
> 上午:抵达上海,前往酒店办理入住手续。
> 中午:享用午餐后,前往外滩,欣赏黄浦江畔的美景,游览上海地标性建筑如浦发银行大楼、汇丰银行大楼等。
> 下午:游览南京路步行街,购买特色礼品或品尝当地美食。
> 晚上:在南京路附近的餐厅享用晚餐,然后去看上海的夜景。
>
> 第二天:
> 上午:前往上海科技馆,了解科技发展历史,观看各种科技展览。
> 中午:在科技馆附近的餐厅享用午餐。
> 下午:游览世纪公园,欣赏美景并放松身心。
> 晚上:在南京路或附近的陆家嘴地区享用晚餐,然后去看上海的夜景。
>
> 第三天:
> 上午:游览上海迪士尼乐园或上海海昌海洋公园,与各种迪士尼角色互动,或者在海洋公园观看海洋生物表演。
> 中午:在迪士尼乐园或海洋公园附近的餐厅享用午餐。
> 下午:自由活动,可以去购物、品尝当地美食或者去博物馆等。
> 晚上:在酒店附近享用晚餐,然后离开上海。
>
> 当然,以上只是一个简单的计划,上海有许多其他景点和活动,例如参观上海博物馆、游览田子坊、观看上海话剧等。具体计划可以根据个人兴趣和时间进行调整。
**여행 계획은 상당히 주관적인 질문이므로 모델에 의해 생성된 응답에는 높은 수준의 랜덤 시드가 적용될 수 있다는 점에 유의하세요. ``torch.manual_seed(1234)``를 사용하여 무작위 시드를 설정하지 않으면 매번 다른 출력이 나오게 됩니다. 랜덤 시드를 일정하게 설정하더라도 하드웨어 및 소프트웨어 환경의 차이로 인해 얻은 결과가 이 튜토리얼과 다를 수 있습니다**.
### Grounded Captioning
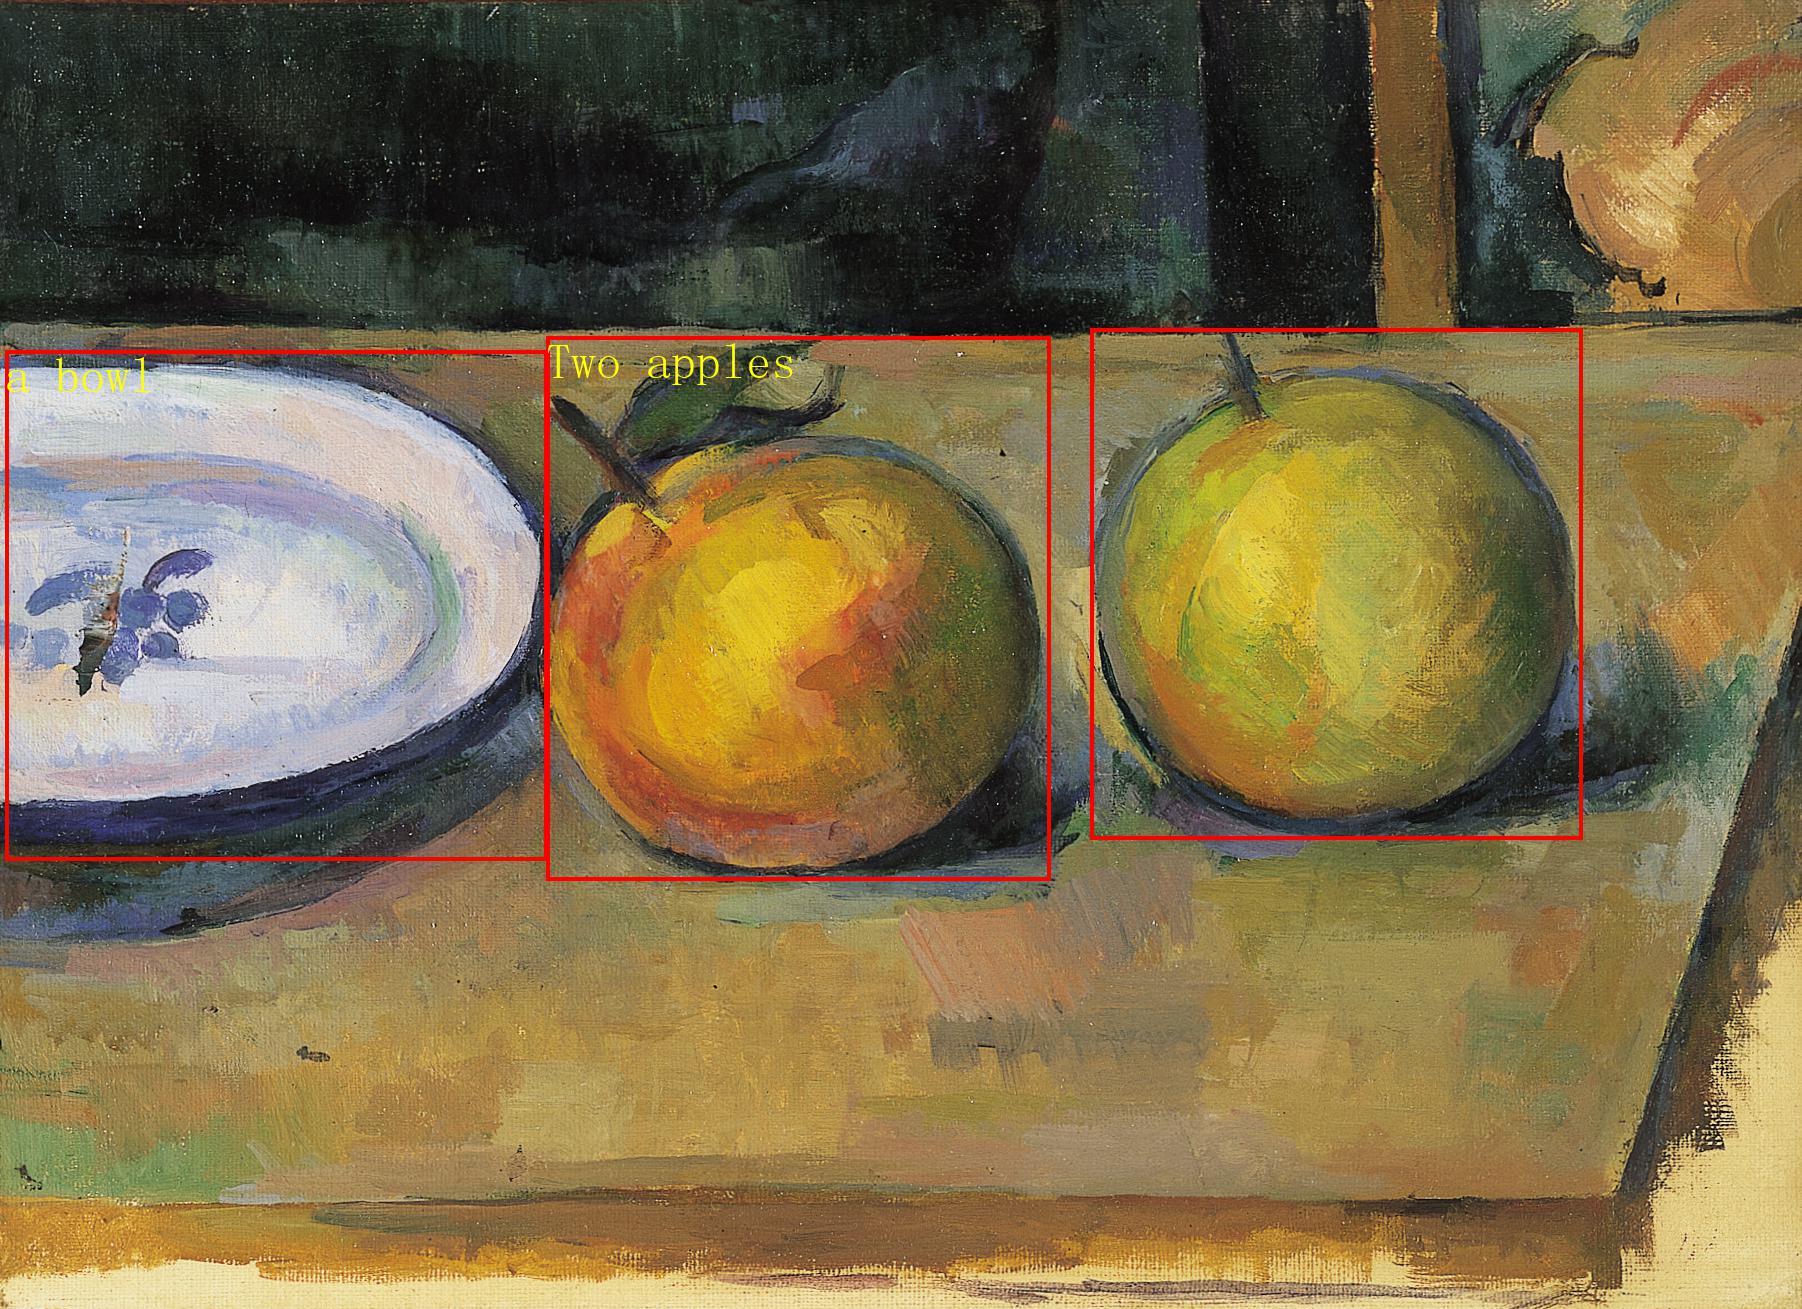
Qwen-VL은 다음과 같이 이미지를 캡쳐하는 동안 피사체의 바운딩 박스 정보를 출력할 수 있습니다.
```
img_url = 'assets/apple.jpeg'
query = tokenizer.from_list_format([
{'image': img_url},
{'text': 'Generate the caption in English with grounding:'},
])
response, history = model.chat(tokenizer, query=query, history=None)
print(response)
image = tokenizer.draw_bbox_on_latest_picture(response, history)
if image is not None:
image.save('apple.jpg')
```
저장된 ``사과.jpg``는 이미지는 아래 스크린샷과 비슷하게 보이게 될 것입니다.
#### How to get the caption without any box-like annotations
때로는 응답에 박스형 주석이 없을 수도 있습니다. 이 경우 다음과 같은 후처리를 통해 안정적으로 정리된 텍스트를 얻을 수 있습니다.
```
# response = '[ Two apples](302,257),(582,671)(603,252),(878,642) and[ a bowl](2,269),(304,674)'
import re
clean_response = re.sub(r'[(.*?)](?:.*?)*(?:.*?)*', r'\1', response).strip()
print(clean_response)
# clean_response = 'Two apples and a bowl'
```